In today's world, web API development is almost always an integral part of any software delivery. While service-oriented architecture (SOA) is not a new concept and has very widely accepted standards and practices, I have specifically found API testing to be a bit more time-consuming and challenging.
One tool that I have relied upon for my API testing is Postman. I thought of noting down my experience of using Postman, mainly for my own future reference and to have it documented in one place. If you find any of these helpful, I must highly recommend going through official Postman documentation.
Personally, I prefer to use tools like postman instead of writing coded API tests.
- Reduces efforts of coding and maintenance
- Improves reusability and collaboration since tests can be easily shared within the team
- Reduces dependency on a stack. Coded tests usually create a dependency on the dev team or stack, reducing resource utilization. Take away the stack and anyone can test API, resulting in increased parallelization.
- Reduces distraction of worrying about writing code
Source code for the API being tested is available at this Github repo. This is a simple example that uses an in-memory collection. For the purpose of this series, I will be using RESTful APIs, however, will include an article on GraphQL and others as well.
So let's start with the basics.
WHY
An API serves as the contract between the code i.e. server, and its consumer i.e. client. It can be an internal or external consumer, private or public. There is a need to ensure that any API must always abide by this contract and its expectations. Based on the use case, there could be various expectations from the API, which can be broadly classified into functional and non-functional requirements.
WHAT
Depending on the use case there may be different (and often multiple) expectations from an endpoint. These could be accuracy, security, performance, usability, accessibility, etc. An endpoint may need to satisfy multiple of these parameters.
For purpose of this article let us consider response success, data accuracy, and response time (say 100ms) as requirements.
HOW
And now let's write our first request. As part of this, we'll get a list of all students that may exist in API. Remember this is the first request, and API uses in-memory collection, so we don't expect to get any "data" back, however that shouldn't be a problem for this test.
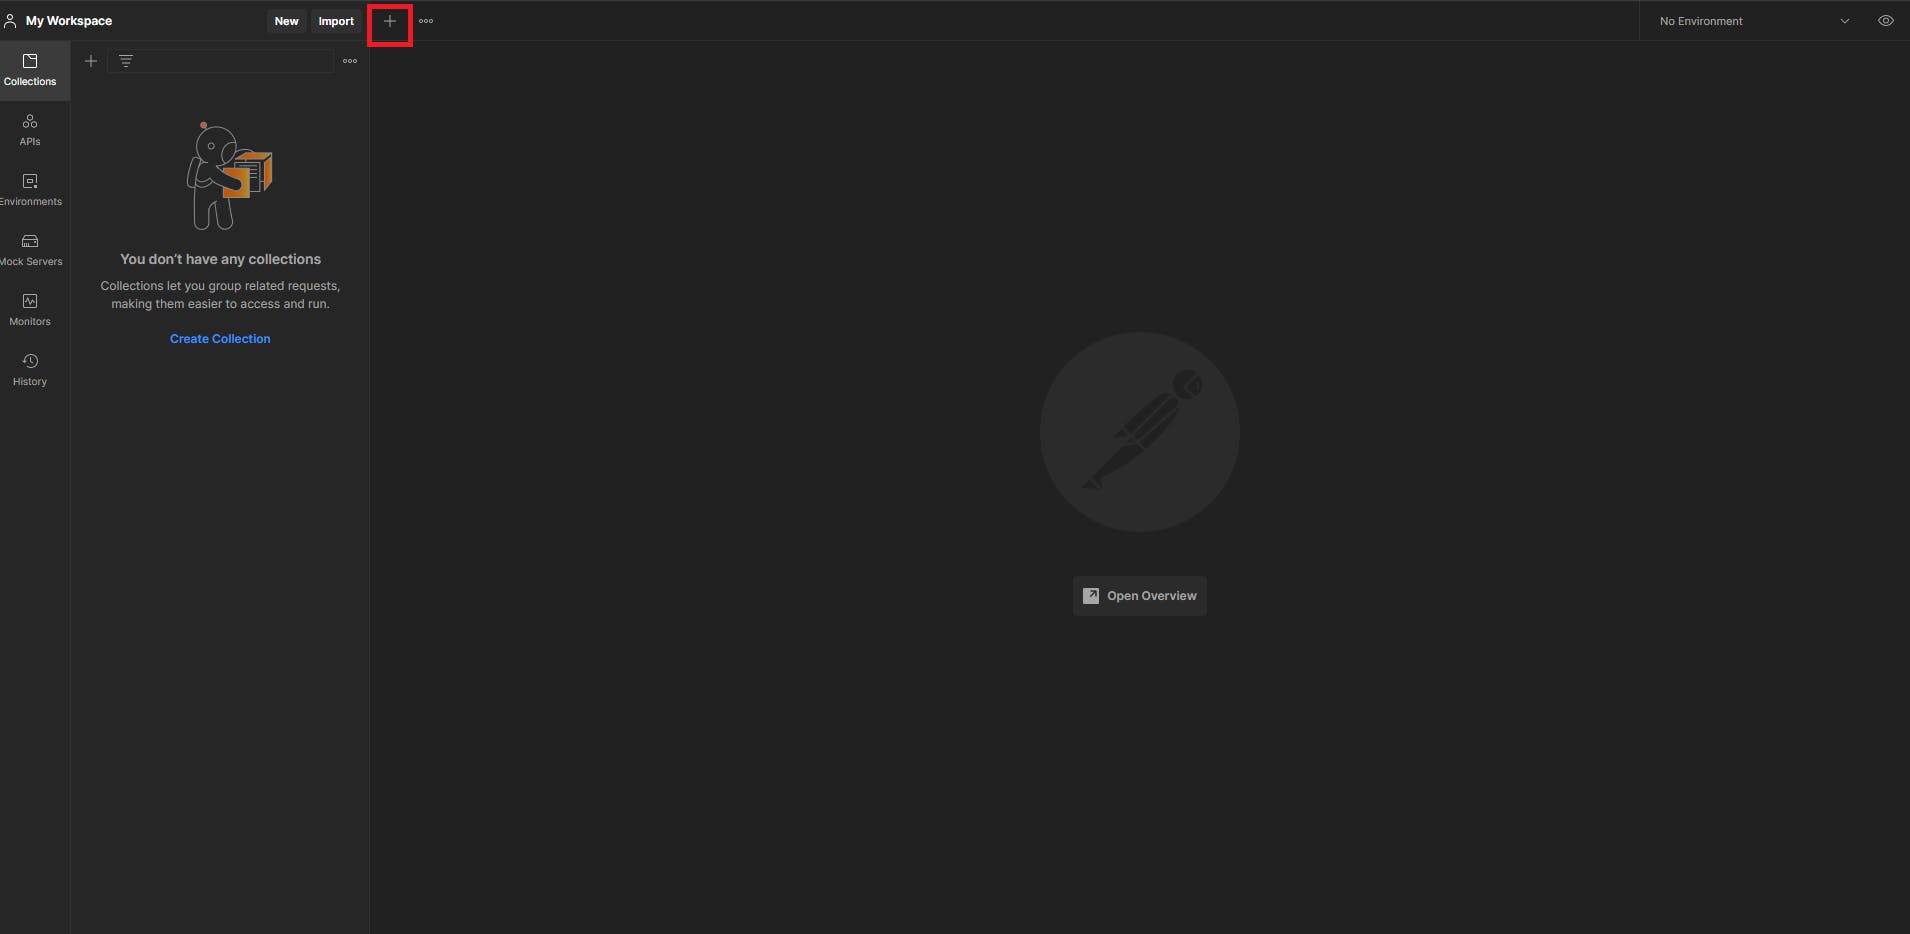 When we open up Postman it should look something like the below image. To create our first request click on the outlined button, which would open up the request window.
 There are few important fields that we will focus on.
Verb: This represents the HTTP verb that we will use for the request. Some of the common ones are GET, POST, PUT, DELETE, PATCH.
URL: This field will contain the endpoint address which we would test.
Send: This will send the request to the mentioned address (i.e. call the endpoint).
There are few more options which one should look at like, request name, params, headers, authorization, body, but we'll ignore those for time being.
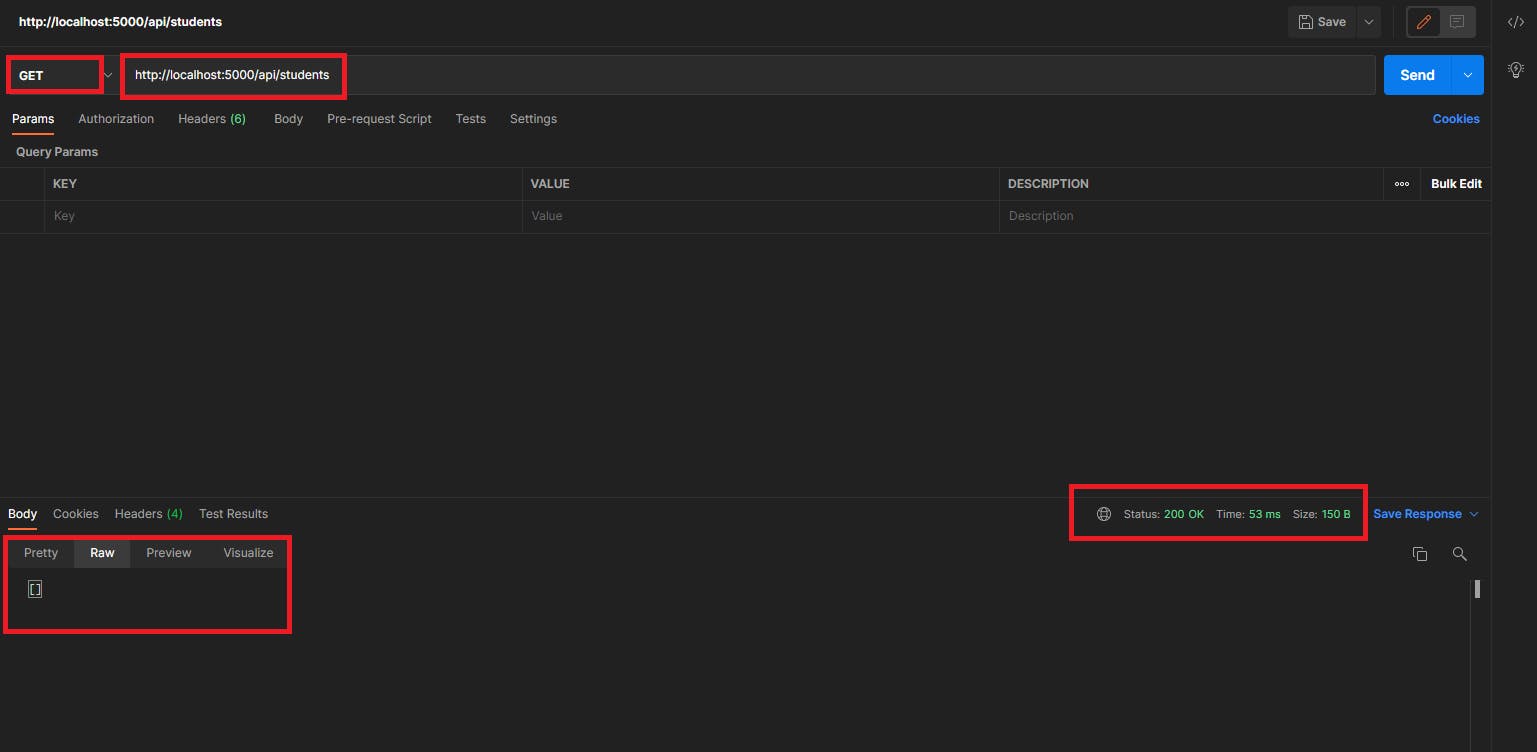
Once we've filled up the above fields as per our setup, we can execute the request. This will return us with a response that has some status code and usually some data. For further understanding of the codes do read through the HTTP status codes.
As we can see, we've received a response of 200 and an empty array for response data, indicating no records currently exist. This proves that we are successfully able to call the endpoint and receive a response from it. And from our manual interpretation of that response, we know it is what we expected. This is usually what a developer would do to test the API they've written returns what is expected. As we can see, the status response time was about 58ms which is well within our threshold of 100ms. So once again manually looking at this we may consider that all our requirements i.e. success, accuracy, and performance have been met. And this brings to a closure of our first working test.

All this is still manual. It is all well and good to be able to manually confirm that API works, but this was just one endpoint, one verb, one request variation. The simplest possible setup. Realistically we'd have multiple endpoints responding to at least 4 of the verbs (denoting CRUD operations), each with different input variations, each of which can possibly have different expectations. So we can agree that verifying a response manually every single time would be extremely cumbersome and inefficient.

Okay okay, I heard you!! Let's automate this manual verification process. For this, we need to first identify our expectations from the request. We currently have three expectations from the request.
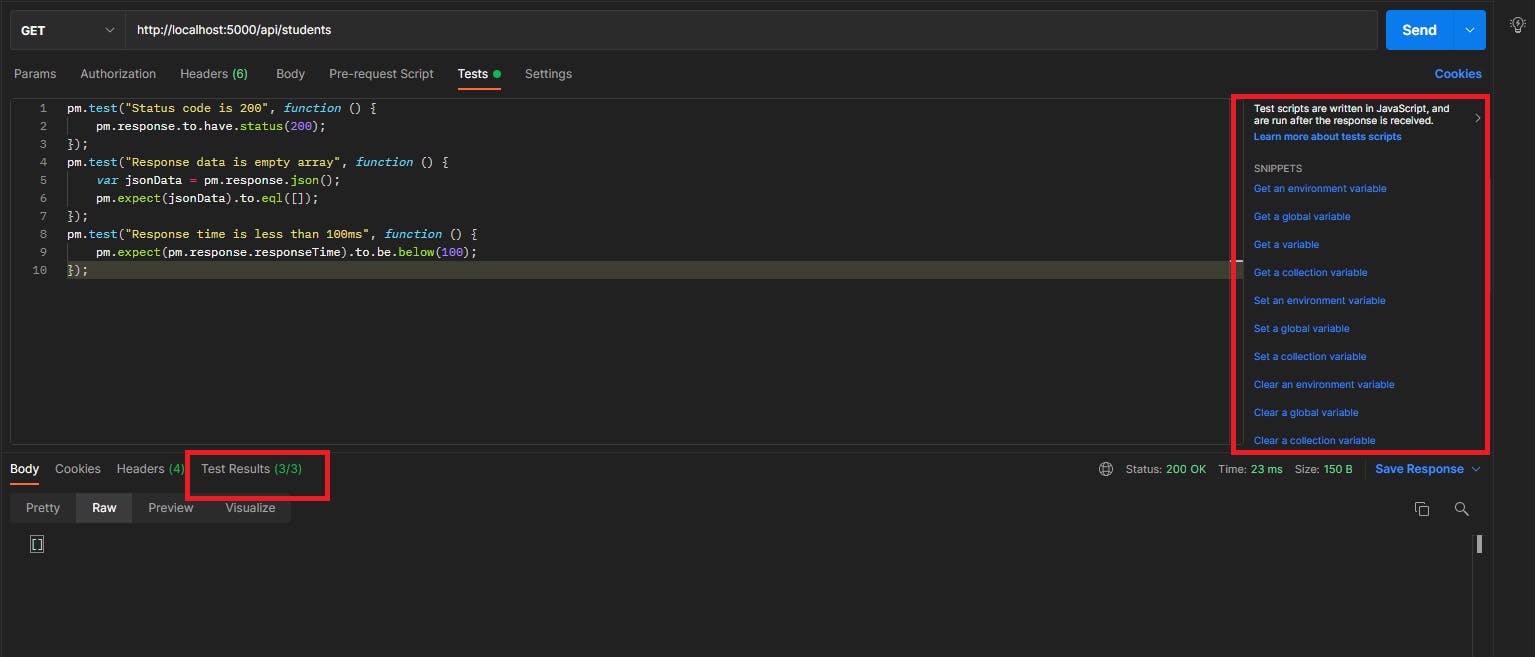
- Success - Response status must be 200
pm.test("Status code is 200", function () { pm.response.to.have.status(200); }); - Data - Response data must be an empty array
pm.test("Response data is empty array", function () { var jsonData = pm.response.json(); pm.expect(jsonData).to.eql([]); }); - Performance - Response time must be under 100 ms
pm.test("Response time is less than 100ms", function () {
 pm.expect(pm.response.responseTime).to.be.below(100);
});
These expectations can be set on the tests tab. On the right-hand side, there're some helper statements that can add commonly used tests. A bit of javascript knowledge would be required for any custom/advanced tests.
Once we've added these test expectations and executed the request again we should see the passed tests in the test results tab of response.
 If something was not as per expectations (say if we update the response time threshold to under 10ms) then we should see that the concerning test fails.
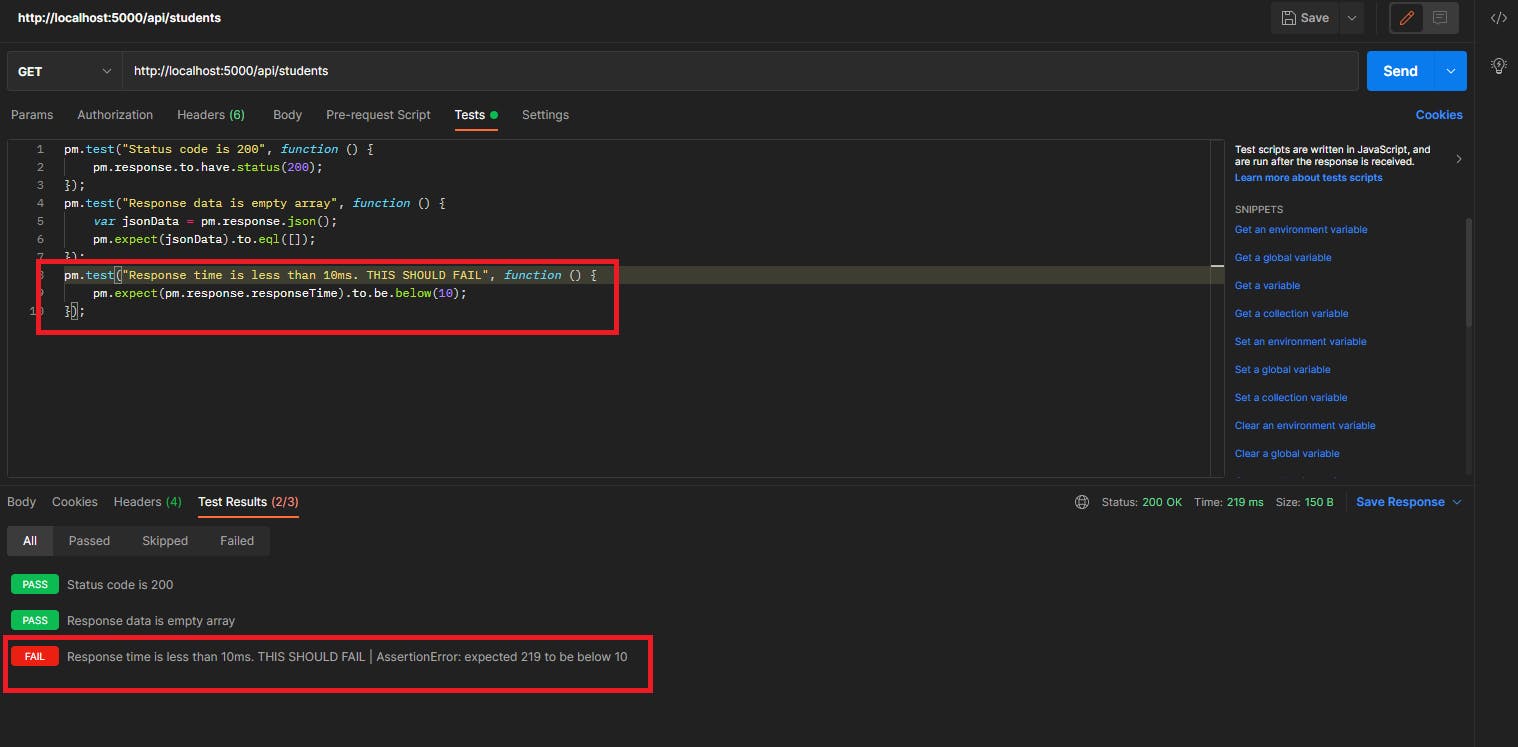
There we go, now we've (partially) automated our testing i.e. the verification part.
Summary
As part of this post, we've understood, basic whys, whats, and how of API testing with Postman. We've also learned how to create and execute a request, get a response and automatically verify the response with help of tests.
